Create Your First React Application - Complete Step-by-Step Guide
By Chetan Sharma · · 6 min read
React: Build Your First Interactive Application
Introduction to React
I built websites with vanilla JavaScript first. Boring. Constantly updating the DOM manually. Even simple state changes required me to think about what changed and update the right elements.
Then I tried React. Components that manage their own state. Declare what I want, React figures out the updates. Suddenly building interactive UIs was fun.
This guide covers React basics: components, JSX, state management. Nothing fancy. Just enough to understand how React works and build something real with it.
Requirements
To get started with React, you need:
- An Operating System: Any computer running Windows, macOS, or Linux.
- A Code Editor:
- Visual Studio Code (VS Code): Highly recommended for its features and extensions.
- Notepad: Limited functionality, not recommended for serious development.
- A Web Browser: For testing your application (e.g., Chrome, Firefox).
- Node.js and npm: Node.js is a JavaScript runtime, and npm is the package manager for Node.js.
- If you don’t have it installed, follow this guide: Install Node.js and npm.
- Basic Knowledge of Command-Line Commands: You’ll use the terminal for running npm commands.
Steps to Create Your First React App
1. Install Node.js and npm
Ensure Node.js and npm are installed. Run the following commands in your terminal to check:
node -v
npm -v
*start
Start: Creating Your First React Application
Follow these steps to create and launch your first React app:
-
Open Your Code Editor
Start by opening your preferred code editor, such as Visual Studio Code (VS Code). -
Open the Command Panel
PressCtrl+J(or use the terminal option in your editor) to open the integrated terminal or command panel. -
Run the React App Creation Command
Copy and paste the following command into the terminal:npx create-react-app your-app-name
Replace your-app-name with the desired name for your project.
- Wait for Installation
Be patient! The process may take 2-3 minutes as React downloads and sets up all the required files and dependencies.
- Navigate to Your Project Directory
Once the setup is complete, use the cd command to move into your new project folder:
cd your-app-name- Start the Development Server
To preview your app, start the React development server by running:
npm startThis command will automatically open your default web browser and display your React application.
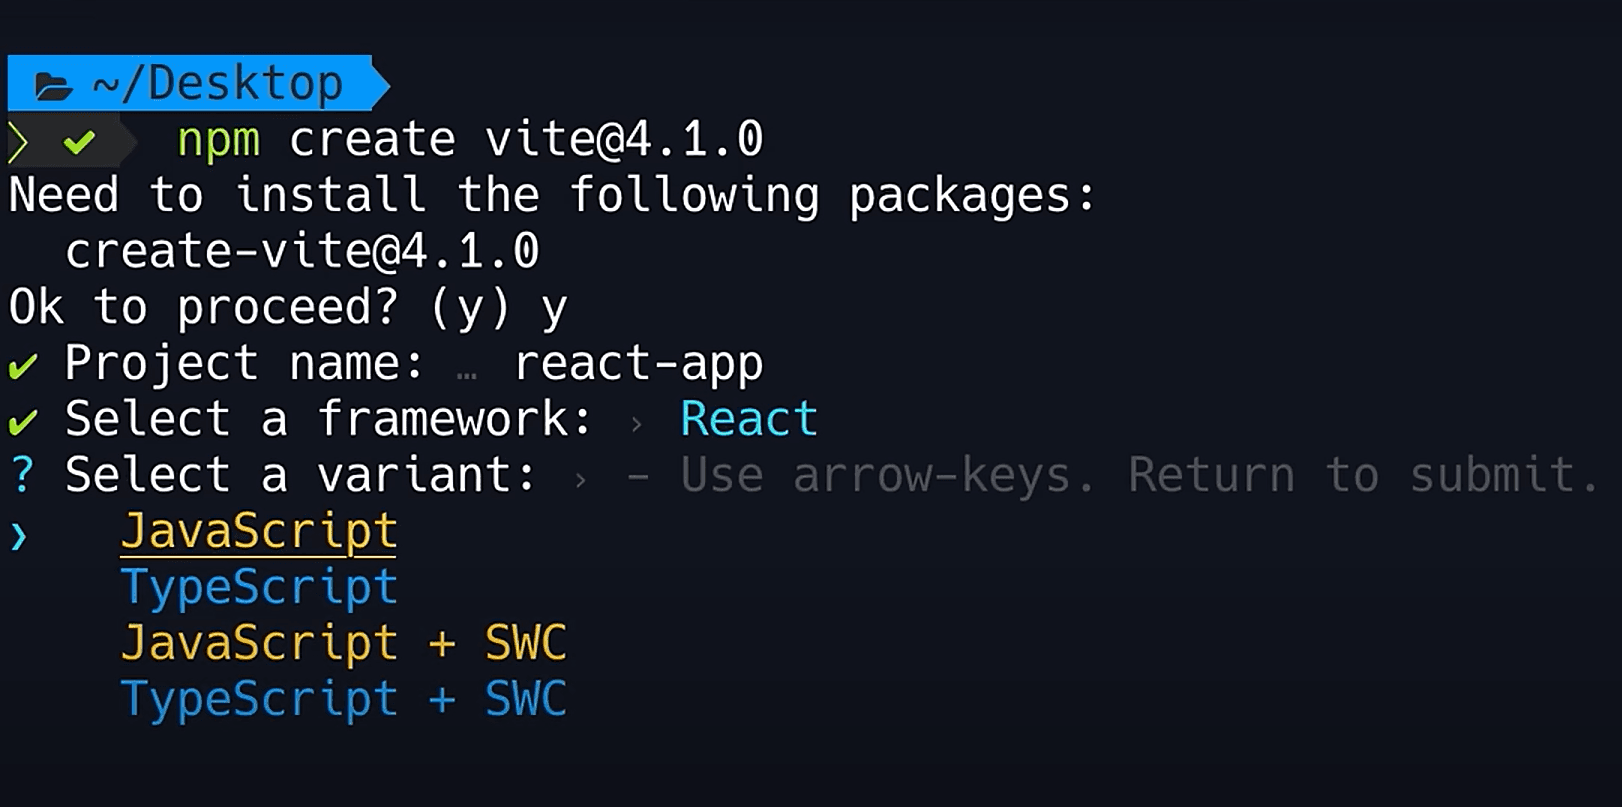
Alternate Way to Set Up React If you prefer a visual guide, refer to this helpful image:
You're Ready!
Congratulations! You’ve successfully created your first React application. Now, explore the folder structure, modify components, and start building amazing features.
Another way is-
Additional Resources
Here are some helpful resources to further enhance your React knowledge:
Understanding React Components
Functional Components (Modern Approach)
// Simple functional component
function Welcome() {
  return <h1>Hello, React!</h1>;
}

// Component with JSX
function App() {
  const name = "John";
  return (
    <div>
      <h1>Welcome to React</h1>
      <p>Hello, {name}!</p>
    </div>
  );
}
Using State with Hooks
import { useState } from 'react';

function Counter() {
  const [count, setCount] = useState(0);

  return (
    <div>
      <p>Count: {count}</p>
      <button onClick={() => setCount(count + 1)}>
        Increment
      </button>
    </div>
  );
}
Props: Passing Data to Components
// Parent component
function App() {
  return <Greeting name="Alice" age={25} />;
}

// Child component
function Greeting({ name, age }) {
  return <p>{name} is {age} years old</p>;
}
Building a Real Project: Todo Application
import { useState } from 'react';
import './TodoApp.css';

function TodoApp() {
  const [todos, setTodos] = useState([]);
  const [input, setInput] = useState('');

  const addTodo = () => {
    if (input.trim()) {
      setTodos([...todos, { id: Date.now(), text: input, completed: false }]);
      setInput('');
    }
  };

  const toggleTodo = (id) => {
    setTodos(todos.map(todo =>
      todo.id === id ? { ...todo, completed: !todo.completed } : todo
    ));
  };

  const deleteTodo = (id) => {
    setTodos(todos.filter(todo => todo.id !== id));
  };

  return (
    <div className="todo-app">
      <h1>My Todo List</h1>

      <div className="input-section">
        <input
          type="text"
          value={input}
          onChange={(e) => setInput(e.target.value)}
          onKeyPress={(e) => e.key === 'Enter' && addTodo()}
          placeholder="Add a new todo..."
        />
        <button onClick={addTodo}>Add</button>
      </div>

      <ul className="todo-list">
        {todos.map(todo => (
          <li key={todo.id} className={todo.completed ? 'completed' : ''}>
            <input
              type="checkbox"
              checked={todo.completed}
              onChange={() => toggleTodo(todo.id)}
            />
            <span>{todo.text}</span>
            <button onClick={() => deleteTodo(todo.id)}>Delete</button>
          </li>
        ))}
      </ul>
    </div>
  );
}

export default TodoApp;
React Hooks: Essential Knowledge
useState Hook
// Track state changes
const [isVisible, setIsVisible] = useState(false);
const [user, setUser] = useState({ name: '', email: '' });
useEffect Hook
import { useEffect } from 'react';

function DataFetcher() {
  const [data, setData] = useState(null);

  useEffect(() => {
    // Fetch data when component mounts
    fetch('https://api.example.com/data')
      .then(res => res.json())
      .then(data => setData(data));
  }, []); // Empty dependency array = run once on mount

  return <div>{data ? data.title : 'Loading...'}</div>;
}
useContext Hook
import { createContext, useContext } from 'react';

const ThemeContext = createContext();

function App() {
  const [theme, setTheme] = useState('light');

  return (
    <ThemeContext.Provider value={{ theme, setTheme }}>
      <MainContent />
    </ThemeContext.Provider>
  );
}

function MainContent() {
  const { theme, setTheme } = useContext(ThemeContext);
  return <button onClick={() => setTheme(theme === 'light' ? 'dark' : 'light')}></button>;
}
Handling Forms in React
function LoginForm() {
  const [formData, setFormData] = useState({
    email: '',
    password: '',
    rememberMe: false
  });

  const handleChange = (e) => {
    const { name, value, type, checked } = e.target;
    setFormData({
      ...formData,
      [name]: type === 'checkbox' ? checked : value
    });
  };

  const handleSubmit = (e) => {
    e.preventDefault();
    console.log('Form submitted:', formData);
  };

  return (
    <form onSubmit={handleSubmit}>
      <input
        type="email"
        name="email"
        value={formData.email}
        onChange={handleChange}
        placeholder="Email"
      />
      <input
        type="password"
        name="password"
        value={formData.password}
        onChange={handleChange}
        placeholder="Password"
      />
      <input
        type="checkbox"
        name="rememberMe"
        checked={formData.rememberMe}
        onChange={handleChange}
      />
      <button type="submit">Login</button>
    </form>
  );
}
Common React Patterns
Conditional Rendering
function UserProfile({ user }) {
  if (!user) return <p>Loading...</p>;
  if (user.error) return <p>Error: {user.error}</p>;

  return (
    <div>
      <h1>{user.name}</h1>
      <p>{user.bio}</p>
    </div>
  );
}
List Rendering
function UserList({ users }) {
  return (
    <ul>
      {users.map(user => (
        <li key={user.id}>
          {user.name} ({user.email})
        </li>
      ))}
    </ul>
  );
}
Higher-Order Components
function withLoader(Component) {
  return function LoaderComponent({ isLoading, ...props }) {
    if (isLoading) return <p>Loading...</p>;
    return <Component {...props} />;
  };
}

const UserProfileWithLoader = withLoader(UserProfile);
Performance Optimization
useMemo
import { useMemo } from 'react';

function expensiveCalculation(data) {
  // Simulate heavy computation
  return data.reduce((sum, item) => sum + item.value, 0);
}

function Dashboard({ items }) {
  const total = useMemo(() => expensiveCalculation(items), [items]);
  return <div>Total: {total}</div>;
}
useCallback
import { useCallback } from 'react';

function SearchUsers() {
  const [query, setQuery] = useState('');

  const handleSearch = useCallback((searchTerm) => {
    // API call here
    console.log('Searching for:', searchTerm);
  }, []);

  return (
    <input
      value={query}
      onChange={(e) => setQuery(e.target.value)}
      onBlur={() => handleSearch(query)}
    />
  );
}
Debugging React Applications
React Developer Tools
- Install "React Developer Tools" browser extension
- Inspect component hierarchy
- View and edit component state
- Trace when components render and why
Console Logging
function App() {
  useEffect(() => {
    console.log('Component mounted');
    return () => console.log('Component unmounted');
  }, []);

  return <div>App</div>;
}
Deployment: Sharing Your React App
Build for Production
npm run buildThis creates an optimized version in the build folder.
Deployment Options
- Netlify - Easy drag-and-drop deployment
- Vercel - Optimized for React, automatic deployments
- GitHub Pages - Free static hosting
- AWS S3 + CloudFront - Professional option
Common Mistakes to Avoid
❌ DON'T modify state directly
// WRONG
state.name = "John";

// RIGHT
setState({ name: "John" });
❌ DON'T forget dependencies in useEffect
// WRONG - runs every render
useEffect(() => fetchData(), []);

// RIGHT
useEffect(() => fetchData(), [userId]);
❌ DON'T use index as key in lists
// WRONG
{items.map((item, index) => <div key={index}>{item}</div>)}

// RIGHT
{items.map(item => <div key={item.id}>{item}</div>)}
Next Steps in Your React Journey
- Build Projects - Create weather app, expense tracker, blog
- Learn State Management - Redux, Zustand, Context API advanced
- Explore Router - React Router for multi-page apps
- Study APIs - Fetch data from real backends
- Explore Advanced - Suspense, lazy loading, concurrent features
- Practice - Daily coding challenges and projects
Additional Resources
- React Official Documentation
- React Tutorial by FreeCodeCamp
- Node.js and npm Setup Guide
- VS Code React Setup
- JavaScript ES6 Features
Conclusion
React has revolutionized how developers build web applications. From startups to Fortune 500 companies, React powers some of the world's most interactive web experiences. By mastering React, you're equipping yourself with one of the most valuable skills in modern web development.
Start small, build consistently, and watch your React skills grow. The journey from your first "Hello React" to building production applications is incredibly rewarding!
That's it you have created your first react application
See you on the other side of your React journey! 🎉